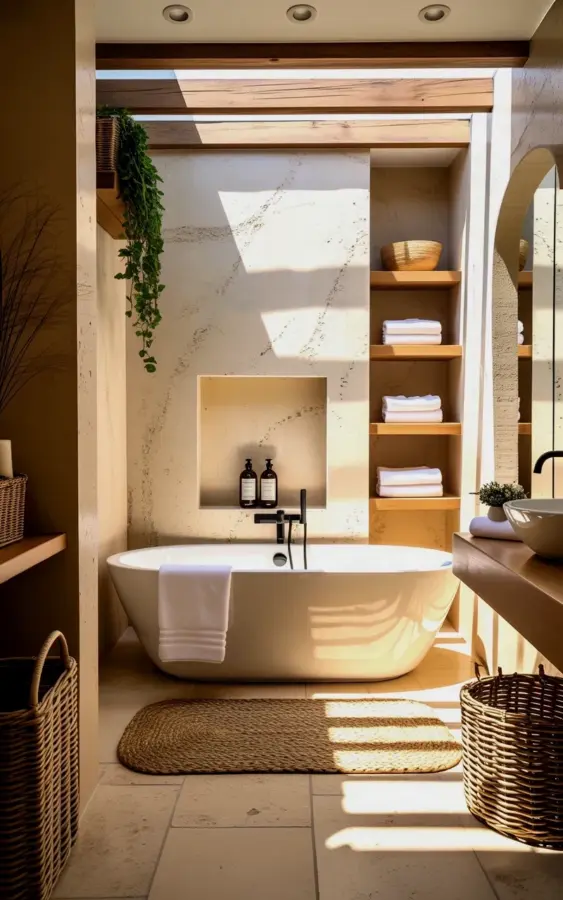
Dust motes drift through the long diagonal light that falls across the cream stone floor, and for a second the empty white oval tub in the center of the room feels less like a bathroom feature and more like a piece of sculpture waiting for water. You have probably pinned 50 photos just like this one, but you are not sure how to actually pull the look together inside a normal house. Look, I get it. The gap between a beautiful pin and a bathroom you can live in is genuinely wide, especially when you are starting from zero.
Building a spa bathroom with a freestanding tub and rustic wood beams does not require a massive remodel budget or a team of designers. It does require a clear understanding of texture, scale, and the way natural materials age over time. This is a beginner-friendly walkthrough of exactly how to recreate this room, what to buy first, and where to spend less without losing the feeling.
How to Combine a Freestanding Tub with Rustic Elements Without Making It Feel Like a Barn
The key tension in this design is mixing a clean white oval bathtub with rough concrete walls and wooden ceiling beams. Done poorly, you end up with a room that feels like a construction site. Done well, the result is warm, intentional, and quietly luxurious.
Here is the thing, the tub should always stay completely smooth and sculptural. Do not add fake wood panels to it or distress the surface. Its entire job is to create contrast against the rough walls and the knots in the wood beams. That contrast is what makes the space feel expensive rather than accidental.
If you are working with a tight budget, purchase the tub first and the walls second. The other way around leads to compromised choices.
The Secret to Concrete Walls That Feel Warm Instead of Cold and Institutional
Exposed concrete can feel like a parking garage in the worst case scenario. In this room, the concrete has a distressed, mottled surface with visible trowel marks, which changes everything. The shadow patterns from the window also break up the flatness, giving the wall a living quality that changes hour by hour.
Cheaper alternative? Limewash paint over drywall. It creates a similar textured, slightly irregular finish that catches light in the same soft way, but it costs a fraction of real concrete. Honestly, I have seen limewash walls fool people in photographs more times than I can count.
If you paint, do not use a roller. Use a large masonry brush and work in small, overlapping sections so the finish stays uneven. A perfect finish here would ruin the whole look.
Stone Tile Floors That Hide the Messes of Real Life
That cream-colored stone tile on the floor is not just beautiful, it is also the most forgiving surface you could possibly have in a bathroom. Water spots, toothpaste splatters, and the occasional dropped bottle of shampoo all blend into the natural variations of the stone. The floor literally hides your mistakes.
Porcelain tile that mimics natural stone is the smarter choice for beginners. It does not require sealing, and it is nearly indestructible. Real stone looks slightly better up close, but the maintenance difference is substantial.
A few practical details to consider before you commit:
- Larger tiles (18×18 inches or bigger) mean fewer grout lines to scrub, which I consider a major life improvement.
- Make sure the tile has some visual movement, a few darker veins or speckles, so the floor does not look flat or fake.
- Radiant floor heating underneath is worth every single penny, especially paired with stone or tile that holds cold.
- Skip the shower pan in this room if you can. The freestanding tub is the star, and the design works better without a competing glass enclosure.
- Use a warm-toned grout, never bright white, in a rustic bathroom. The white grout will scream for attention in a bad way.
Wood Ceiling Beams: The Anchor That Ties the Whole Room Together
The wooden beams running across the ceiling are what separate this room from a perfectly nice but forgettable spa bathroom. They add depth, warmth, and a visual stopping point at the top of the room. In this photo, the beams are rough, natural, and noticeably old, which gives the entire space a sense of history.
Here’s a common beginner mistake: buying cheap faux wood beams that all look identical. They end up feeling like a stage set. Instead, look for beams with real character, knots, cracks, or even old nail holes.
For a smaller bathroom, you can skip the full ceiling treatment entirely. One long floating shelf in the same wood tone, positioned above the tub or beside the mirror, will echo the warm rustic element without cramping the room. That is the “steal the natural textures” approach mentioned in the Pinterest description, and it genuinely works.
Built-In Shelving: The Spa Bathroom Storage Solution You Did Not Know You Needed
On the right wall of this room, there is integrated wooden shelving holding neatly folded white towels and a few ceramic vessels. These shelves are recessed directly into the wall, so they do not stick out and interrupt the clean sightlines of the room. This is one of the most useful details for real life, because let me tell you, a spa bathroom loses all its calming magic when you have fluffy towels stacked on a plastic rack from Target.
If you are not doing construction, you can absolutely install floating wooden shelves instead. Aim for one shelf at a time, not a giant grid. This room works so well because the shelves are minimal and intentional, not packed full of stuff.
A short, practical aside: measure the depth of your folded towels before finalizing any shelf depth. Standard towels folded in half are about 12 inches deep, so plan accordingly. A prettier shelf that does not fit your towels will just become a dusty ledge.
For a Smaller Space: Steal the Texture, Skip the Scale
Not everyone has a bathroom big enough for a central freestanding oval tub. That is completely fine. The principles of this design scale down beautifully if you focus on the textures rather than the layout.
Start with a small wooden bath mat (teak is a great choice), one concrete accent wall or a textured finish, and a narrow floating shelf in dark wood. Add ceramic or stone accessories in muted earth tones, then install soft recessed lighting on a dimmer switch. Just that combination will shift a typical builder-grade bathroom into something that feels personal and calm.
Even a tiny powder room can adopt the stone floor and one wood beam overhead. The proportion of the photo is not the magic, the mix of rough and smooth is.
Three Practical Details to Nail the Spa Light and Shadow Effect
Notice how the shadows in the photo make everything more interesting. The diagonal shadows come from large windows placing natural light low to the ground. Recessed ceiling lights also matter, they cast soft, diffuse glows instead of harsh downlights.
Recreate this with a dimmer switch on all overhead fixtures. That alone transforms how the space feels during an evening bath.
Also select warmer color temperature bulbs, around 2700K, to flatter skin tones and complement the stone and wood. Cool white light will make your spa bathroom feel like an operating room, and no amount of expensive tile will save you from that.
And my last thought, carefully place one simple ceramic vessel with a single dried branch or eucalyptus bundle near the tub. A decade ago I bought a cheap stone bowl at a flea market and set it on a window ledge in my own bathroom. Six years later, it is still the only styled thing in that room I would never remove. Oddly enough, the tiny personal objects matter more than any design trend.
Putting It All Together in a Way That Works for an Actual Human Budget
Start with a wish list, then buy in this exact order: the largest surface pieces first (floor and walls), then the tub, then the beams, and finally the shelving and accessories. This prevents you from running out of money before the expensive essentials are in place.
Do not underestimate the visual power of one handmade ceramic piece placed on a shelf. The few unique objects in the room, not the perfectly stacked towels, will make it feel like a real person lives there. The studio is actually kind of perfect with this design, it is calm, quiet, and not decorated at all.
The whole design ultimately comes down to balancing just three things: a smooth object, a heavy vertical surface, and a warm feel under your feet. If you mix those ingredients and keep the lighting soft and warm, your bathroom will feel like a retreat even if it is technically the size of a large closet.
I hope you take the plunge. Wait patiently for a sunny day, fill that oval tub all the way to the top, and let the light hit the water exactly the way it does in the photo. You will have turned a small, practical room into one of the nicest places in your entire home.
What will be the first corner you tackle?
Leave a Comment