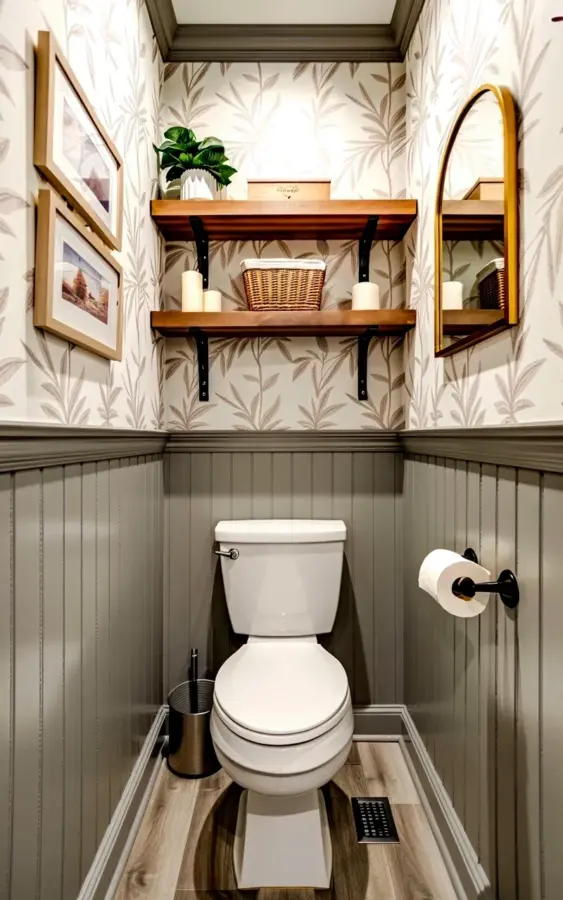
Look, I finally tackled our tiny powder room and honestly, I almost wrecked the whole thing three different times before it clicked. That DIY powder room makeover you keep eyeing on Pinterest? The one with the floral wallpaper and warm floating shelves? Yeah, I did that. But I made every rookie mistake along the way so you don’t have to. Our half bath started as a boring white box. Now it has light gray wainscoting on the lower half, a white floral wallpaper with beige leafy patterns up top, two wooden floating shelves holding a little potted plant and white candles, a brass arched mirror on the right wall, plus two framed art pieces in wooden frames. The transformation is everything. But the process? A hot mess. Let me walk you through the five mistakes I made (and how to fix them) so your makeover looks like a pro did it.
The Biggest Mistake I Almost Made with Floral Wallpaper
Floral wallpaper is gorgeous. But here’s the thing: pattern scale matters more than you think. I ordered a giant rose print without checking the repeat distance. It arrived, I unrolled it, and the flowers were the size of dinner plates. In a tiny half bath, that looked overwhelming. Like the wallpaper was attacking the room.
What saved me? I returned it and bought a smaller, more delicate pattern. The one in the photo features white flowers with beige leaf motifs, and the repeat is only 12 inches. That keeps the eye moving without drowning the space. Another mistake? Not ordering an extra roll. I cut my first strip wrong (okay, I measured wrong, twice) and had to patch a seam. Always buy 15 percent more than the calculator says. Trust me, you’ll botch a strip. I did.
Quick wallpaper tips for small bathrooms:
- Match the scale to your wall area: small print for small rooms
- Use a level for the first strip, not a plumb line (too finicky)
- Wipe off excess paste immediately with a damp sponge, or you’ll see crusty spots forever
Why Floating Shelves Almost Ruined Our Half Bath (and How to Fix It)
Floating shelves look clean and airy. But if you mount them too low, they become head-bumping hazards. If you mount them too high, you can’t reach them. My first attempt? I put the bottom shelf at 48 inches from the floor. Looked great in my head. In reality, I kept smacking my forehead on the corner when I leaned over the toilet. Not cool.
I moved them up to 52 inches for the bottom shelf, with 10 inches between shelves. That gives enough clearance for the toilet tank (ours sits at about 30 inches) and still feels reachable. Also, I used toggle bolts instead of plastic anchors. The first shelf sagged under the weight of a planter and three candles. Plastic anchors in drywall? Not strong enough. Switch to metal toggle bolts rated for 50 pounds each. Problem solved.
And those warm wooden shelves you see? They’re pine stained with a honey oak finish. I wanted them to contrast the cool gray wainscoting. Works well. But don’t stain them in a closed room. The fumes made my eyes water for two days. Open a window or do it outside.
Two-Tone Wainscoting: What I Learned About Getting the Line Perfect
Two-tone wainscoting is a classic move. Lower half light gray, upper half wallpaper. The challenge is the transition line. I used a standard chair rail at 36 inches high, which is traditional. But I almost ruined it by painting the gray after the wallpaper was up. Wet paint dripped onto the wallpaper. Big mistake. Paint the wainscoting section first, let it dry completely, then hang the wallpaper above it. That way any drips land on bare wall, not your expensive paper.
Another thing: don’t caulk the gap between wainscoting and wallpaper until the wallpaper is fully dry (24 hours). I caulked too early and the wallpaper shrunk slightly, leaving a visible crack. Had to redo a section. Not fun. Wait the full day, use a paintable caulk, and smooth it with a damp finger. That gives you a crisp, professional edge.
Also, the gray you see in the photo? It’s Benjamin Moore Gray Owl. Not too blue, not too beige. But the sample looked different under the store lights. Buy a sample pot, paint a large square on your wall, and live with it for a day. I didn’t. Almost went with a shade that looked like concrete.
The Brass Arched Mirror: A Mistake I See Everywhere Online
Brass arched mirrors are trending. And they’re gorgeous. But the mistake people make is choosing one that’s too small. Our mirror hangs on the right wall (not over the sink, because the sink is a pedestal setup). I bought a 20 by 30 inch arch. Too tiny. Looked like a porthole. Returned it for a 24 by 36 inch version. That size balances the wall and the floating shelves opposite.
Another thing: reflection. The mirror reflects the wallpaper pattern, which is lovely, but also reflects the toilet. If you have a cramped room, the mirror will double everything. That’s fine, but check where the mirror is aimed. Ours catches the plant on the shelf and the candles. Makes a nice vignette. Position it carefully before drilling. Tape the mirror in place with painter’s tape, step back, and adjust. My husband thought I was crazy. Then he saw the result.
And the brass finish? We got unlacquered brass. It will patina over time. Some people love that look. I wanted it shiny. So I applied a clear lacquer spray before hanging. If you don’t, expect fingerprints and greenish spots after a few months. Either embrace the patina or seal it.
Styling Floating Shelves Without It Looking Cluttered
Styling those warm floating shelves was harder than hanging them. My first attempt: I put everything I owned up there. Soap dispenser, three candles, a fake succulent, a framed photo, a tiny vase. Looked like a garage sale. Here’s what ended up working (exactly as shown in the photo):
- One green potted plant (a real pothos, it tolerates low light and humidity)
- Two white pillar candles in simple holders
- A small woven basket (hides a few q-tips and matches)
- A wooden tissue box (keeps tissues accessible but not ugly)
That’s it. Four items across two shelves. The rule of thumb: leave 40 percent empty space. I learned that from a home staging blog years ago. If you crowd every inch, the shelves stop being functional and start being dust collectors. Also, vary heights. The plant sits taller on one end, the candles are mid-height, the basket is low. That creates visual rhythm. Don’t put all the tall items on the same shelf. Spread them out.
One odd detail: the tissue box is wooden and matches the shelf stain. I found it at a thrift store for two dollars. Sanded and re-oiled it. Took ten minutes. Much cheaper than buying a new one. And it adds texture without screaming for attention.
Half Bath Decor Mistakes: What to Avoid with Small Spaces
Overall, half bath decor is about restraint. The biggest mistake I see online? Using too many competing patterns. Floral wallpaper plus a patterned rug plus a colorful shower curtain (okay, no shower in a half bath, but you get the idea). In our room, the wallpaper is the star. The rug is a solid neutral. The art pieces (two framed prints in simple wooden frames) are subtle botanical line drawings. They don’t fight the florals.
Also, lighting matters. I swapped the builder-grade boob light for a small semi-flush fixture with a warm bulb. The brass tones echo the mirror. That one change made the wallpaper look richer. If you keep the old cold white light, even the prettiest wallpaper will look washed out.
Another mistake: ignoring the toilet. Yes, the toilet is the focal point in the photo. That’s unavoidable in a tiny powder room. But I painted the toilet? No. I just made sure the seat was clean and new. A miscolored or stained toilet ruins even the best makeover. If yours is old, replace it. A basic white toilet is fine. Ours is a standard two-piece model. Nothing fancy. But it’s crisp and bright, which keeps the room feeling fresh.
Conclusion: Just Start (and Learn from My Blunders)
This makeover took me three weekends instead of one. I messed up the wallpaper strip, hung the shelves too low, caulked too soon, and almost bought a mirror fit for a dollhouse. But honestly, those mistakes taught me more than any tutorial could. The end result is a tiny half bath that feels intentional and cozy. Floral wallpaper, warm floating shelves, brass details, two-tone wainscoting. It all works because I fixed the errors along the way.
So go ahead. Pick your wallpaper, buy your shelves, and start cutting. But keep this list handy. Your powder room will thank you. And if you make a mistake? That’s okay too. Slap a plant on a floating shelf and call it character. Got a before-and-after photo of your own? Drop it in the comments. I’d love to see it.
#powderroommakeover #floralwallpaper #floatingshelves #halfbathdecor #diyhomeimprovement
Leave a Comment